Introduction
Version 8.0 of GainSeeker was the first step in a gradual platform transfer of the entire GainSeeker Suite from Visual Basic programming language to .NET. programming language.
Some programs remain in Visual Basic, and others have been completely rebuilt from the ground up. The Dynamic Reports module, the GainSeeker Charts module, and some others are built entirely within the .NET framework.
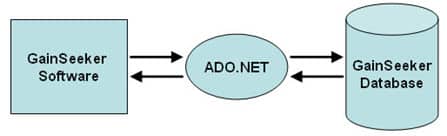
.NET uses software mechanisms called ADO.NET data providers to access SQL databases. ADO is the acronym for “ActiveX Data Object.” There is no ADO.NET service provider available for Btrieve or Pervasive databases being run in File mode. This makes it necessary for anyone using these older platforms to upgrade to Pervasive.SQL version 9.71 or higher.
This tutorial is a do-it-yourself guide. We strongly recommend that you read through all the steps and watch the videos before you begin.
Before proceeding:
- Be sure you have a valid backup of your system, and
- That you have the appropriate server rights before making any changes
If you are not confident about performing this process, Hertzler offers this conversion as a fee service. For more information, contact sales@hertzler.com or call Hertzler Systems at 574-533-0571.
Step 1 – Install GainSeeker Suite version 8 or beyond
The first step is to upgrade your GainSeeker software to version 8 or beyond by following the instructions printed on the envelop for the install disc for GainSeeker Suite. The install program can be accessed by running SETUP.EXE from the root folder of the install disc.
Step 2 – Install the ADO.NET data provider
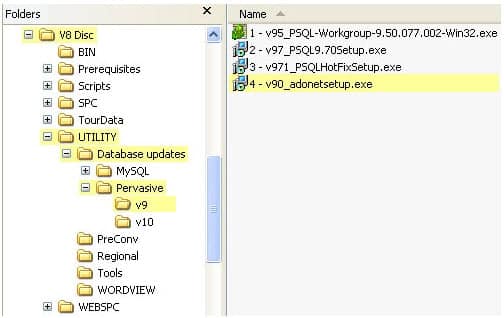
The GainSeeker install disc (for versions 8.0 and beyond) contains a file name: v90_adonetsetup.exe . This installs the driver necessary for GainSeeker’s .NET programs to communicate with a Version 9 Pervasive.SQL database. If you are using Pervasive Version 10, the driver installation program is 2_PSQL-SDK-Dotnet-10.13.055.000-Win32.exe (located in the V10 folder).
Note: You must first update to a version of Pervase 9.71 or higher. Pervasive versions prior to 9.71 do not support ADO.NET communications. If you are running a version of Pervasive 9 earlier than 9.71, the GainSeeker install disc includes the necessary updates. If you are running a version of Pervasive prior to 9.0, Please contact Pervasive to upgrade to a newer version.
Step 3 – Determine where to locate shared data
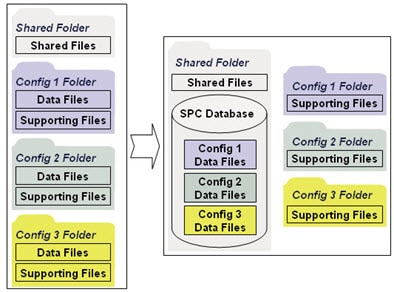
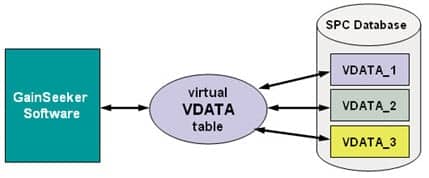
In a Pervasive file mode (Btrieve) environment, database files could be placed in any folder. Typically this meant that data files were grouped into separate folders, based on configuration. Pervasive in Database Mode requires that all files associated with a database are grouped into a single folder. The graphic below demonstrates how files are organized before the conversion, and how they are grouped when finished.
Before we can group the data into a single folder, we must decide which folder that should be. In most cases this will be the folder you currently have defined in the CONFIG_PATH variable of the CMS.INI file. This folder will hold the data files for all configurations. Ensure that the drive has:
- Ample space to hold the current data, and
- Ample space for the database to grow
Step 4 – Copy the first set of data files into the shared folder
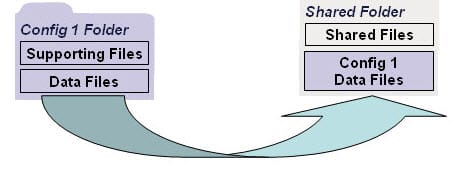
The shared folder is where your database will reside. Rather than creating a database from scratch, you can start with your first configuration’s data files. This involves copying (not moving) the data files from your first configuration. Data files include anything with an extension of .DAT. When copying this first configuration, you need to also copy the data dictionary (.DDF) files.
All files excluding the data and data dictionary files, are considered supporting files. Supporting files are configuration-specific, and should be left in their original folder.
Step 5 – Create a new database
Open the Pervasive Control Center (PCC) program. Then, create a new database using your shared folder as the location. PCC finds the data definition files in the shared folder, and automatically includes all necessary data files in the new database.
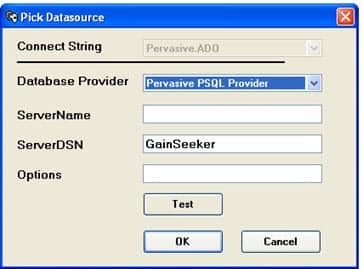
Step 6 – Create a new connection string in the GainSeeker System Administration module
Create a connection string to your database. This allows GainSeeker’s .NET programs to connect to your new database.
Step 7 – Create a new DSN in Windows ODBC Administrator
A Data Source Name (DSN) is a data object in Windows that defines how ODBC drivers should connect to a database. Create a Windows DSN for the new GainSeeker database. DSNs are maintained in the Windows ODBC Data Source Administrator program, which can be run from the Administrative Tools folder. Access this folder in the Windows Control Panel. The following video details the necessary steps.
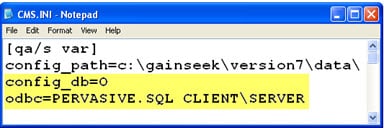
Step 8 – Put the new ODBC information into CMS.INI
GainSeeker uses a file named CMS.INI to customize settings and preferences for each workstation or each network user. On a traditional client/server network, a separate copy of CMS.INI is installed in the Windows folder of each GainSeeker workstation. One of the primary functions of the CMS.INI is to define which database GainSeeker should use. To access your new database, you need to put some information into each workstation’s CMS.INI file.
Step 9 – Move additional configurations
Pervasive File Mode databases allow multiple tables of the same name if they are in different folders. Pervaise Database Mode requires all tables within a database to reside in the same folder, so every table must have a unique name. GainSeeker can map virtual names to physical table names. This makes it possible to keep data from separate configurations stored in separate tables within the same database.
For each additional configuration, there are two necessary tasks:
- Step 9A: Create new tables with unique names for the configuration. GainSeeker includes a tool called the Table Creation Utility that makes this easy to do.
- Step 9B: Use a GainSeeker utility called ConvertDB to move the data from the old, File Mode database into the new tables.
The following pages explain these tasks in detail.
Step 9A – Adding an additional configuration: Create new tables for the next configuration
The first step in moving an additional configuration into your new Pervasive database is to create the necessary tables. The Tables and File Paths dialog in the GainSeeker System Administration module makes it easy to associate a GainSeeker configuration to a new set of tables. The Table Creation Utility (also accessible from the System Administration module) makes it just as easy to create the new tables.
Step 9B – Adding an additional configuration: Copy the data into the new database
After you have created the new tables necessary for the additional configuration, you need to copy the data one table at a time, from the old database into these new tables. The UtilityTools folder of the GainSeeker Version 8 installation disc includes a utility named ChangeDB.exe. This utility provides an easy way to move the data. Watch the video to see a demonstration of how to use this tool.
