A request for a Tech Tip on Dynamic Reports came in last week. (Actually, I had a few of them!!!!) This excites me knowing there are some of you guys out there actually reading my blog!!!! (Thank you) As a result, I thought it only be fair to try my best in noting some best practices for Dynamic Reports.
For those of you who are not familiar with Dynamic Reports, it is a 3rd party reporting tool. Many of our customers desire the ability to print a Certificate of Authenticity (COA) for their customers out of GainSeeker. For this reason, we packaged Dynamic Reports into our software. It allows for customized reports not available in our charting module. When you require full control of the desired output this tool becomes handy. I will try my best to give you some best practices in this article.
Dynamic Reports Tips
- I do NOT recommend working with Dynamic Reports without some initial training unless you are familiar with another kind of report writer. A simple 2-day training program accelerates your learning curve. In person training helps to bring all the little things you need to know into plain sight and aids in finishing a report with ease.
- It is important to remember what is in the retrieval settings:
- Part Number(s)
- Statistics
- Settings (similar to those found in charts)
- Columns (which are your Traceability and data information)
- Charts (being able to include charts from GainSeeker)
- The options you have available always depends on where you click.
The Dynamic Reports Design Form
The Dynamic Reports Design Form has seven areas on it. I’ve numbered them off for you:
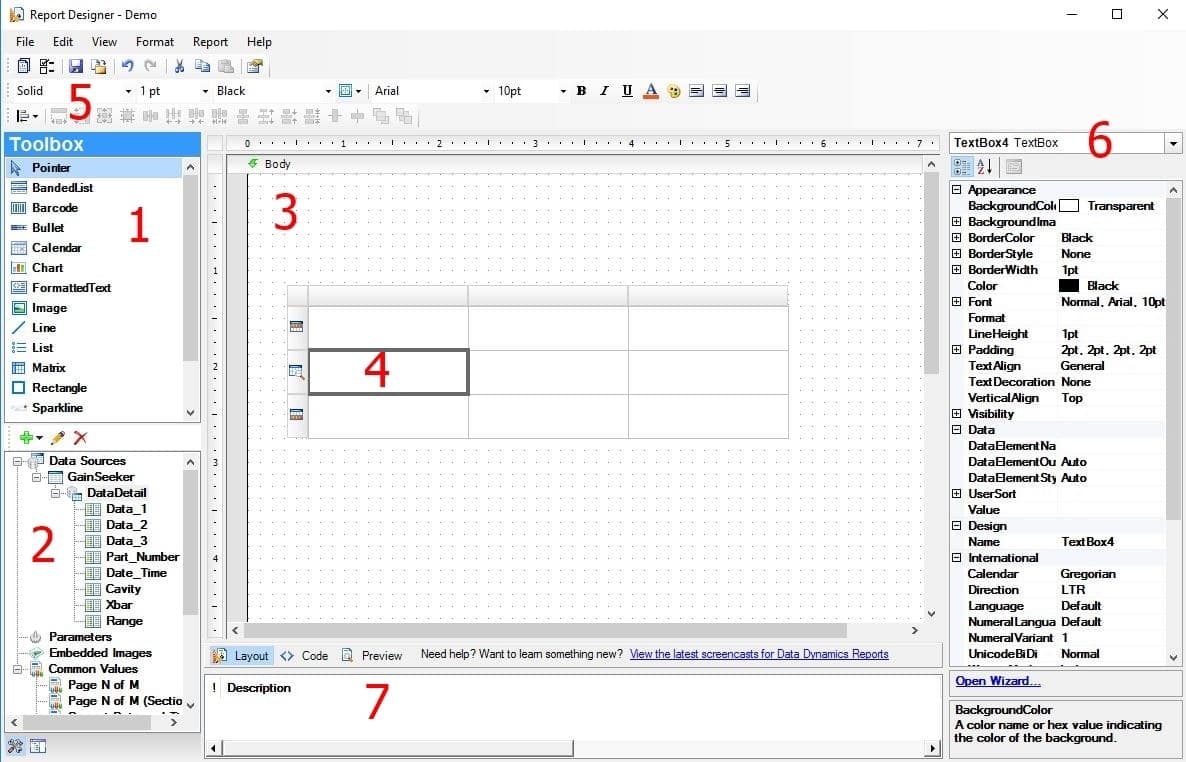
GainSeeker Dynamic Reports Design Form
Here is what you’ll find in each area:
Area 1: The Toolbox
When customizing your report, keep in mind for each object you want to place on the report must be contained within an item in the Toolbox. For example, if I want to add a logo to the top of the page I must FIRST click on the image container in the toolbox and place that image container in the body of the report before I associate the .jpg file to it. (Most utilized items in the Toolbox are the Image, Matrix, and List.)
Area 2: Data Sources
All the items you picked in the retrieval process are listed here. You can get creative and add parameters, or even query another database for information. I would consider those options for the experts. Be that as it may, most of our customers are content with information that already resides in GainSeeker. You also have available; page numbers, dates, page x out of y, total pages, etc. (Important note: If your DataDetail and Statistics are in separate expanded tree structures then they cannot be combined in the same table. There is an option to place them in the same tree structure if need be.)
Area 3: The body aka your Design Work-space
Here is your work-space area. You design your report structure here. All your items from #1 & #2 are placed in this area. (Keep in mind your document size as Dynamic Reports will allow you to go larger than 8.5 x 11.)
Area 4: A Table
Actually, #4 is placed in the “data row” of the table. Remember from item #1 a table is just one of the tools in the toolbox. A table, by default, has 3 rows: A header row, the data row, and a footer row. A point often overlooked is where to place the data fields. Most people place the desired data field in the top row. This is a no-no. Always remember what the 3 rows of the table are for. (To add columns to the data table you right-click on the dark gray area above the header row and choose add column.)
Area 5: The Icons
Above #5 are icons. The important three are the leftmost. The first icon views the report. The next icon goes back to the retrieval settings. If you are like me, you always forget something and need to go back to select a few more items. Finally, the 3rd icon saves your document. I recommend saving often. (You can hover over each icon to see the description of the icon.)
Area 6: The Drop down Selector
Sometimes it is easier to click on this drop down instead of clicking the exact area in the design area of the body. This area is also a great visual reminder for what properties you are looking at. The properties are located just below the drop down selector. (Each tool, text box, image, etc. contain different properties and it is extremely important to make sure you are changing the correct item’s property.)
Area 7: The Message box
You will see errors here if there are any. Please note the Preview button located above the #7 does not function. As a result of placing Dynamic Reports within GainSeeker, the correct way to view your report is to click the View Report icon mentioned in #5.
Still have a question? Maybe I can help you out. If you want to talk training or a quick question feel free to call me! (That is what I am here for.)
If you do not have GainSeeker yet, I urge you to schedule a demo! Oh, and if you tell them Jen sent ya, I will sit in on the demo with you to help answer any technical questions you may have.
