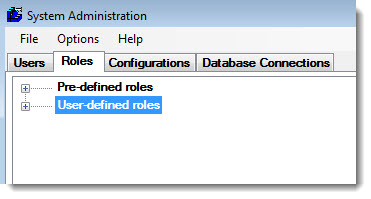
For each individual permission that displays
one of the following symbols on this tree, you can set the Access Level.
For some of the permissions, your choice of access levels may be limited
to Full Access and Deny
Access.
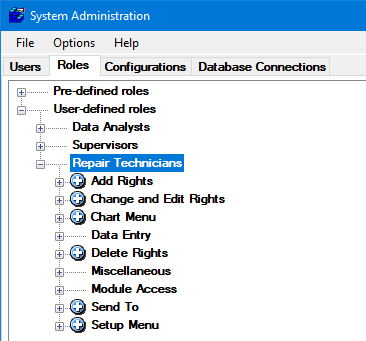
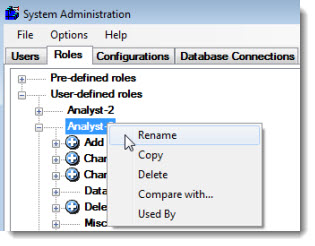
To change the access level for any permission
or group of permissions that displays one of the symbols shown above:
This describes what each permission affects in current GainSeeker modules.
It does not describe the impact of these permissions on Legacy GainSeeker
modules such as SPC Data Entry, DMS Data Entry, SPC Charts and Reports,
DMS Charts and Reports, or Enterprise Dashboard.
Permission |
Affects |
Add Rights >> Dashboards |
Create
new Dashboard (or Copy Dashboard) |
Add Rights >> Data |
Adding
Data or Notes |
Add Rights >> Desktops |
Save
Static and Dynamic Desktops |
Add Rights >> Filters |
Create
new Filter (or Copy Filter) |
Add Rights >> Report Formats |
Create
new Report Format (or Copy Report Format) including Dynamic Reports,
Inspections, Dashboards, Dashboard Retrievals, statistics lists,
and data & detail columns formats
Dynamic Reports 2 module - Import reports and Import All Legacy
reports |
Add Rights >> Sessions |
(Legacy
modules only) |
Add Rights >> Standards and
Processes |
Add
Standards and Processes |
Change and Edit Rights >> .Launch
Settings |
Edit
.Launch settings |
Change and Edit Rights >> Allow
overrides >> Chart settings |
Show
Chart overrides branch on Settings dialog in GainSeeker Charts |
Change and Edit Rights >> Allow
overrides >> Retrieval and configuration settings |
Show
Retrieval/Configuration branch on Settings dialog in GainSeeker
Charts |
Change and Edit Rights >> Allow
overrides >> Standard settings |
Show
Standard overrides branch on Settings dialog in GainSeeker Charts |
Change and Edit Rights >> Anchor |
Edit
the Anchor Point value of a Data Record |
Change and Edit Rights >> Background
Picture |
(Legacy
modules only) |
Change and Edit Rights >> Bypass |
Edit
the Bypass value of a Data Record |
Change and Edit Rights >> Corrective
Action |
Edit
Corrective Action (Event, Cause, Action Taken) of a Data Record |
Change and Edit Rights >> Current
Report |
Change
Statistics List report format that is displayed |
Change and Edit Rights >> Dashboard
or Dynamic Report Before Viewing |
Edit
Dashboard
Edit/Open Dashboard
Manage Retrievals and Assign Retrievals to a Dynamic Report
for Dynamic Reports 2
Edit Dynamic Report Design for Legacy Dynamic Reports |
Change and Edit Rights >> Data |
Edit
Data Record values (including Traceability values) |
Change and Edit Rights >> Data
Table Columns |
Change
Data Columns report format that is displayed |
Change and Edit Rights >> Desktop/Report
Values (prompt for changes) |
Edit/Open
for Desktops and Dynamic Reports 2
Prompt before viewing Report for Legacy Dynamic Reports |
Change and Edit Rights >> Edit
Filter |
Edit
Filters (SPC, DMS, Statistics) |
Change and Edit Rights >> Edit
Report Format |
Edit
Report Format (Statistics List, Data Columns, Detail Columns,
Control Chart Data Grid Columns)
Edit and Save changes to Report Design for Dynamic Reports 2
Save changes to Report Design for Legacy Dynamic Reports |
Change and Edit Rights >> Fonts
and Colors |
(Legacy
modules only) |
Change and Edit
Rights >> Locked Items |
Allow
user to edit Locked items in GainSeeker Inspections, Python Scripts,
Chart Skins, Dashboard retrievals, Dashboards, Dynamic Reports
2 |
Change and Edit Rights >> Monitor
Status |
(Legacy
modules only) |
Change and Edit Rights >> Notes |
Edit
the Note of a Data Record |
Change and Edit Rights >> Show
Bypass On List |
(Legacy
modules only) |
Change and Edit Rights >> Standards
and Processes |
Edit
a Standard or Process |
Chart Menu >> Chart Titles |
Change
the Chart Titles |
Chart Menu >> Define Button
For Chart Titles |
(Legacy
modules only) |
Chart Menu >> Display Options |
(Legacy
modules only) |
Chart Menu >> Group Data |
Change
Group Data (SPC, Pareto, DPU, OEE) |
Chart Menu >> Legend |
View
Chart Legend |
Chart Menu >> Scaling |
Change/Use
Chart Manual Scaling |
Chart Menu >> Variation Or
Drill-Down Wizard |
Run
Variation or Drill-Down Wizards |
Data Entry >> Edit Data From
Chart |
In
PC Collect, right-click on a data table and edit the data and
traceability for a data record |
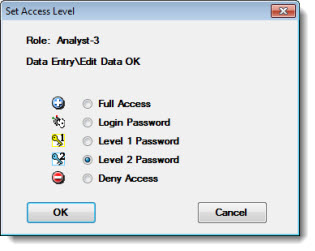
Data Entry >> Edit Data OK |
(Legacy
modules only) |
Data Entry >> Edit Note From
Chart |
In
PC Collect, right-click on a data table and edit the note for
a data record |
Data Entry >> File Close |
(Legacy
modules only) |
Data Entry >> File Exit |
(Legacy
modules only) |
Data Entry >> File Open >>
Planned Session & Planned Inspection |
(Legacy
modules only) |
Data Entry >> File Open >>
Quick Start |
(Legacy
modules only) |
Data Entry >> File Open >>
Stored Session |
(Legacy
modules only) |
Data Entry >> File Open >>
Template & Inspection |
(Legacy
modules only) |
Data Entry >> Power Tools Menu
>> Data Entry Designer |
(Legacy
modules only) |
Data Entry >> Power Tools Menu
>> Data Entry Planner |
(Legacy
modules only) |
Data Entry >> Power Tools Menu
>> Priority List Editor |
(Legacy
modules only) |
Data Entry >> Session Menu
>> Data Entry |
(Legacy
modules only) |
Data Entry >> Session Menu
>> Date Time |
(Legacy
modules only) |
Data Entry >> Session Menu
>> Real Time |
(Legacy
modules only) |
Data Entry >> Session Menu
>> Refresh |
(Legacy
modules only) |
Data Entry >> Session Menu
>> Skip Characteristics |
(Legacy
modules only) |
Data Entry >> Session Menu
>> Statistics |
(Legacy
modules only) |
Data Entry >> Session Menu
>> Undo! |
(Legacy
modules only) |
Data Entry >> Setup DMS Data
Entry Options |
(Legacy
modules only) |
Data Entry >> Switch To Full
Trace List |
(Legacy
modules only) |
Data Entry >> Terminate Timed
Session |
(Legacy
modules only) |
Data Entry >> View Hidden Templates |
(Legacy
modules only) |
Delete Rights >> Audit Trail |
Delete
an Audit Trail record |
Delete Rights >> Dashboard
Retrievals |
Delete
Dashboard retrievals (also need Delete Rights >> Report
Formats) |
Delete Rights >> Dashboards |
Delete
Dashboards (also need Delete Rights >> Report Formats) |
Delete Rights >> Data |
Delete
a Data Record or a Note from a Data Record |
Delete Rights >> Desktops |
Delete
a Desktop |
Delete Rights >> Filters |
Delete
a Filter |
Delete Rights >> Monitor records |
(Legacy
modules only) |
Delete Rights >> Planned Sessions |
(Legacy
modules only) |
Delete Rights >> Range |
Delete
a Range of Data, Standards, or Process Specifications |
Delete Rights >> Report Formats |
Delete
Report Format (Dynamic Reports, Statistics List, Data Columns,
Detail Columns, Control Chart Data Grid Columns, Dashboard, Dashboard
Retrievals, Inspections, Planned Inspections) |
Delete Rights >> Standards
and Processes |
Delete
Standards, Processes, or Process Specifications |
Delete Rights >> Stored Sessions |
(Legacy
modules only) |
Miscellaneous >> Add and Edit
Python Scripts |
Add
or Edit Python Scripts |
Miscellaneous
>> Execute Non-Embedded Python Script, Start & Stop
GS Console Manager Groups |
Allow
the Start Python function in PC Collect
Allow the Start Group and Stop Group buttons in GS Console |
Miscellaneous >> Modify Login
>> Change Configuration |
Change
Configuration from File menu in most modules |
Miscellaneous >> Modify Login
>> Change Password |
Change
Pasword from File menu in most modules |
Miscellaneous >> Modify Login
>> Login or Logout |
Login
from File menu in most modules |
Miscellaneous >> Monitor Database
Integrity |
(Legacy
modules only) |
Miscellaneous >> Monitor Options
Menu |
(Legacy
modules only) |
Miscellaneous >> Reset Password
Utility >> Show Passwords That Are Not Expired |
Show
passwords that are not expired |
Miscellaneous >> Reset Password
Utility >> Show Passwords That Never Expire |
Show
passwords that never expire |
Miscellaneous >> Save As Default
>> Local |
(Legacy
modules only) |
Miscellaneous >> Save As Default
>> Shared |
(Legacy
modules only) |
Miscellaneous >> See all users,
roles and configurations |
Allow
user to view users, roles, and configurations other than his/her
own in the Administration module |
Miscellaneous >> View Audit
Trail tab - Data |
Show
Audit Trail tab on Edit Data dialog (if applicable) |
Miscellaneous >> View Audit
Trail tab - Standards |
Show
Audit Trail tab on Edit Standard dialog (if applicable) |
Miscellaneous >> Web Access
>> Links |
Allow
user to click links on Help menu and Help About dialog |
Miscellaneous >> Web Access
>> Update Notification |
Allow
user to check for updates from Help menu |
Module Access >> .Launch |
Run
.Launch |
Module Access >> Administration |
Run
the System Administration module, use GainSeeker Utility module
to Export All Control Files |
Module
Access >> Data Entry Template Designer, GainSeeker Inspections,
& GS Console Manager Setup |
Run
the SPC Designer module
Run the GainSeeker Inspections module
In the GS Console Manager module, use the Set Up Colors button
and the Set Up Groups button |
Module Access >> DMS Charts
& Reports |
(Legacy)
Run the DMS Charts & Reports module |
Module Access >> DMS Data Entry |
(Legacy)
Run the DMS Data Entry module |
Module Access >> Dynamic Reports |
Run
the Dynamic Reports 2 module and the Legacy Dynamic Reports module |
Module Access >> Enterprise
Dashboard |
(Legacy)
Run the Enterprise Dashboard module |
Module Access >> GainSeeker
Charts (SPC, DMS, Dashboard) |
Run
GainSeeker Charts |
Module Access >> GS Analyze |
Run
GS Analyze |
Module Access >> Import Export |
Run
Import/Export Data from GainSeeker Utility |
Module Access >> Monitor |
(Legacy)
Run the Monitor module |
Module
Access >> PC Collect & GS Console |
Run
PC Collect, GS Console, and GS Console Manager modules |
Module Access >> Planner |
(Legacy)
Run the Planner module |
Module Access >> SPC Charts
& Reports |
(Legacy)
Run the SPC Charts & Reports module |
Module Access >> SPC Data Entry |
(Legacy)
Run the SPC Data Entry module |
Module Access >> Utilities
>> Audit Trail |
Run
Audit Trail from GainSeeker Utility |
Module Access >> Utilities
>> Note Manager |
Run
Note Manager from GainSeeker Utility |
Module Access >> Utilities
>> Pervasive Tools |
Run
the Pervasive Tools module |
Module Access >> Utilities
>> Priority List Editor |
Run
Priority List Editor from GainSeeker Utility |
Module Access >> Utilities
>> Reset Password Utility |
Run
Password Reset Utility |
Module Access >> Utilities
>> SQL Utility |
Run
SQL Utility from GainSeeker Utility |
Module Access >> Utilities
>> Standard Duplicator |
(Legacy)
Run the Standard Duplicator |
Module Access >> Utilities
>> Standard Utility |
Run
Standard Utility from GainSeeker Utility |
Module Access >> Utilities
>> Transfer Utility |
Run
Report Transfer from GainSeeker Utility |
Send To >> Clipboard |
Send
information to Clipboard |
Send To >> Email |
Send
information to Email |
Send To >> File |
Send
information to File |
Send
To >> Printer Or Editor |
Send
information to Printer, Application, Word, PowerPoint, Excel,
WordPad, MINITAB, JMP, or Editor (like NotePad) |
Setup Menu >> Corrective Action
Lists |
Edit
Corrective Action Lists (Event, Cause, Action Taken) from GainSeeker
Charts, GainSeeker Inspections, and PC Collect |
Setup Menu >> MINITAB Chart
Windows |
Setup
MINITAB links in GainSeeker Charts |
Setup Menu >> Processes |
Edit
Processes from GainSeeker Charts, GainSeeker Inspections, GainSeeker
Utility, and PC Collect |
Setup Menu >> Standards |
Edit
Standards from GainSeeker Charts, GainSeeker Inspections, GainSeeker
Utility, and PC Collect |
Setup Menu >> Store Gates |
Store
Gates from current data retrieval in GainSeeker Charts |
Setup Menu >> Store Target
Values |
Store
Target value from current data retrieval in GainSeeker Charts |
Setup Menu >> Traceability
Lists |
Edit
Traceability Lists from GainSeeker Charts, GainSeeker Inspections,
and PC Collect |