You can customize the SPC labels that GainSeeker uses by default for a configuration.
|
|
Navigate to these settings on the Configuration tab of the Systems Administration module following this path:
Chart overrides | (configuration name) | User-defined labels | SPC
When the data subgroup you enter needs to be marked as a change in the process, you can designate the subgroup as an Anchor point. If your company uses a different term to describe this situation, you can change this label to reflect that term.
To change this label:
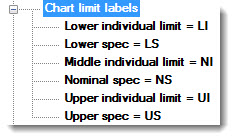
These labels are used to designate the lines for the upper spec limit, the nominal spec, the lower spec limit, the upper individual limit, the midpoint between the upper and lower individual limits, and the lower individual limit on charts. If you display more than one set of limits on charts, the best practice is to keep these labels as short as possible.
To change any of these labels:
You can designate up to three rows of titles to display above charts that include your company name, chart title, statistics, or other information. See Labels and Titles

Each standard allows you to define individual limits for a specified part number and characteristic. These are upper and lower limits (other than specification limits) for individual data values within a data subgroup. However, if most people in your company use different terminology to describe these limits, you may want to change this label to reflect that term.
To change this label:
To change the real-time failure messages used by the PC Collect and SPC Data Entry modules:
Right-click the Real-time error messages setting. (If you have changed some configuration settings and not yet saved them, you will be prompted to save or cancel your changes before continuing.)
The Real-Time Error Messages dialog opens.
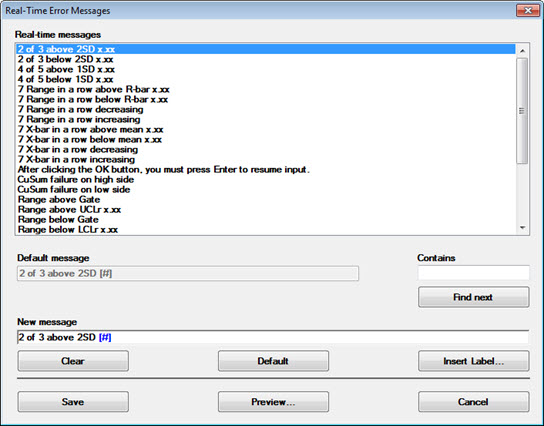
Click the message line in the Real-time messages list that you want to change. GainSeeker displays the Default message for this item and the New message that you can change.
 To find specific messages
in the list, type a portion of the message in the Contains
box and then click Find next,
or press the ENTER key. The next item in the list containing the text
you specified highlights.
To find specific messages
in the list, type a portion of the message in the Contains
box and then click Find next,
or press the ENTER key. The next item in the list containing the text
you specified highlights.
Enter the new text to use for this message in the New message box. (To revert to the default message for this item, click Default.) Real-time messages cannot be blank. You can enter text for the new message, insert a message component from the Insert Label list, or both. To insert a message component from the Insert Label list:
Position your cursor at the point in the message where you want to insert a component. Then, click Insert Label.
The Insertable Labels dialog opens.
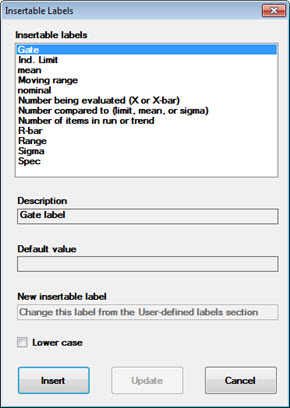
Click the component In the Insertable labels list that you want to insert into the message.
For some of these components—such as mean, Moving range, and nominal—you can enter different text in the New insertable label box. For other components—such as Gate, Ind. Gate, or Spec—the text of these components must be changed from a different setting on the Shared (DMS and SPC) label or SPC labels tree.
To insert this component:
In lower-case text, select the Lower case checkbox.
As it appears in the Insertable labels list, clear the Lower case checkbox.
In your message, click Insert.
A placeholder for the component highlights in the New message box, and the full text of the new label displays in the Real-time messages list.
To change another statistics label, repeat steps 2–3 above.
To save your changes and return to the Configurations tab of the Administration module:
Choose whether to Save the real-time messages for this workstation only or to Save the real-time messages to be shared with other workstations.
Click Save.
Each standard allows you to define upper and lower specification limits ("Spec limits") for the specified part number and characteristic. However, if most people in your company use different terminology to describe these limits, you can change this label to reflect that term throughout GainSeeker.
To change this label:
To change the labels that this configuration uses for all SPC statistics or to make specific statistics unavailable to a configuration:
Right-click the Statistics Labels setting. If you have changed some configuration settings and not saved them, you will be prompted to save or cancel your changes before continuing.
The SPC Statistics Labels dialog opens.
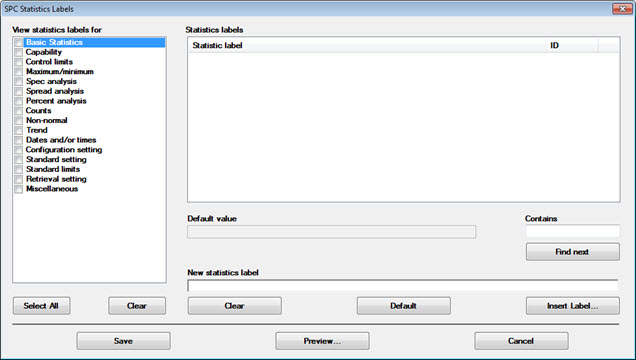
Statistics labels for the selected categories display in the Statistics labels list. For information about these statistics, see SPC statistics available
An identification number
corresponding to each statistic displays in each row. This number is useful
for finding a statistic for which a label has been changed. It can also
be used by some template commands, Cms.ini settings, and other features
to designate a specific statistic.
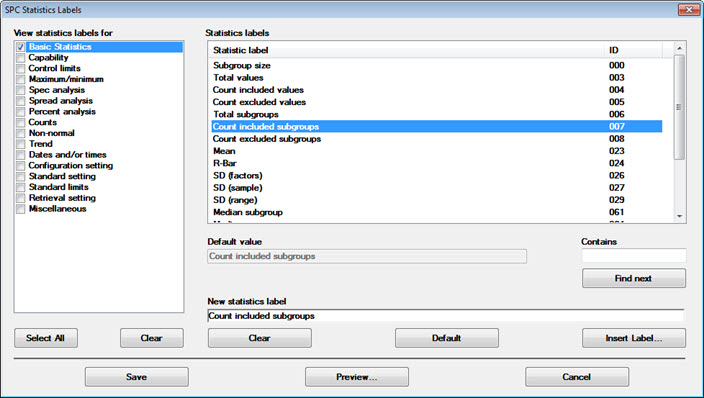
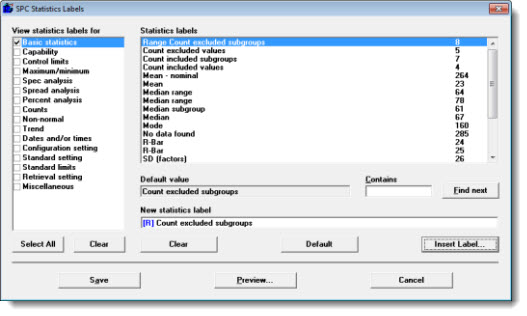
Click a label in the Statistics labels list that you want to change or make unavailable to the configuration.
To find specific messages
in the list, type a portion of the message in the Contains
box and then click Find next,
or press the ENTER key. The next item in the list containing the text
you specified highlights.
When you click the label you want to change, GainSeeker displays the Default value for the label and the New statistics label that you can change.
Enter the new label you want to use for this statistic in the New statistics label box. (To revert back to the default value for this label, click Default.)
You can type the new label, insert another label component from the Insert Label list, or both.
To make the selected statistic unavailable to a configuration, remove all text from the New statistics label box. If this statistic already exists in some statistics list formats such as chart titles or dashboards, for example, the Default value for this statistic is used. Statistics with a blank label display at the bottom of the Statistics labels list so you can make them available to a configuration by applying a label.
To insert a label component from the Insert Label list:
Position your cursor at the point in the label where you want to insert a component.
Click Insert Label. The Insertable Labels dialog opens.
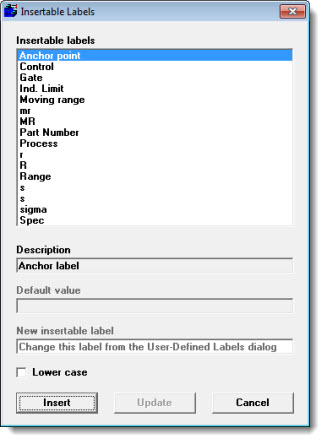
Click the component In the Insertable labels list that you want to insert into your statistics label.
For some of these components—such as Moving range, Range, and sigma—you can enter different text for that component in the New insertable label box. For other components—such as Control, Gate, or Part Number, the text of these components must be changed from a setting on the Shared (DMS and SPC) labels or SPC labels tree.
To insert this component:
In lower-case text, select the Lower case checkbox.
As it appears in the Insertable labels list, clear the Lower case checkbox.
Or, to add this component to your statistics label, click Insert.
A placeholder for this component highlights in the New statistics label box, and the full text of the new label displays in the Statistics labels list.
To change another statistics label, repeat steps 2–4 above.